Thursday, August 8, 2013

Crockpot Chicken Taco Chili

Oh man, let me just begin by saying this stuff is good. Really good. And it's even better as leftovers. Even my hubby said it was great as leftovers. It's super healthy and can be vegetarian/vegan/gluten free if you want it to be. This "chili" is really filling and hearty enough to fill you up, but super easy for busy moms and wives.

We make a variation of recipes close to this all the time, but somehow this was just on another level. So tasty it's sure to be a new staple in our home!


My bowl...so good!

CROCKPOT CHICKEN TACO CHILI 
(Serves 4-6)

Ingredients:
1 onion, chopped
1 can black beans
1 can corn
1 can tomato sauce
1 can rotel
1 packet taco seasoning
1 Tbsp cumin
1 Tbsp chili powder
3-4 chicken breasts (optional--substitute another can of beans of your choice if making vegan)

Toppings: Fritos, sour cream, cilantro, shredded cheese

Directions:
  1. Combine everything, with the chicken breasts on top (I use frozen) into your crockpot.
  2. Cook on low in your crockpot for 8 hours. EASY!
  3. 30 minutes before serving, remove chicken and shred. Mix back into the chili. 
  4. Serve with your choice of toppings. Since it's so healthy, we splurged for a little bit of lightly salted fritos and low fat sour cream, and a little bit of shredded cheese. 

ENJOY! I'm making a double batch next time, and will prep in my next freezer cooking day. :)

---

http://i.walmartimages.com/i/p/00/02/10/00/03/0002100003528_500X500.jpg
P.S. On the note of Mexican shredded cheese, buy this stuff! Stop buying the yellow stuff! This is sooo good, and you won't believe how good all of your Mexican food recipes will be. Quesadillas that taste like you're at Pappasitos! Not kidding! I think there is some without the cream cheese, but the "queso quesadilla" cheese is what you're looking for and maybe a step towards more authentic flavors. 

Try it, you'll like it!

Like the black/bean and corn combo? Try my recipe here for some kickin' quesadillas using this cheese!

The Best Quesadillas. Ever.
 

Tuesday, August 6, 2013

Finding Rest


Rest. Why can't we seem to find enough? Or, rather, when we have times of rest, why is it unfulfilling? 

Answering these questions is my mission after this weeks' sermon, Jesus-Ultimate Rest Stop, at my wonderful church, The Waters, calling me to action. 

Wait, making a more active effort to rest more?  Maybe I'm missing the point...

I admit, I am one of those people our pastor talked about as someone who feels guilty about resting. It makes me feel unproductive, lazy, and unfulfilled. Maybe that explains some of the onset of antsy-ness I'm feeling awaiting my normally busy schedule of a teacher of freshman.

But time and time again, rest is mentioned in the Bible as something that God not only wants us to have, but something He modeled for us in the Creation story. 

Slow down. Take a breath. Relax.

So the passage that has resonated with me the most since Sunday's sermon is actually Jesus talking about rest. After preaching about the people whose cities that had seen some of Jesus' most impressive miracles, but still didn't believe, Jesus prayed with the people, saying,
"Come to Me, all who are weary and burdened, and I will give you rest. Put my yoke upon your shoulders--it may appear heavy at first, but it is perfectly fitted to your curves. Learn from Me, for I am gentle and humble of heart. When you are yoked to Me, your weary soul finds rest. For my yoke is easy, and my burden is light." --Matthew 11:28-30 (The Voice)
The original word for rest in this context is anapausis, meaning cessation of movement or labor, intermission, or (most interesting to me) recreation. Even further into the root word, the word means to refresh, to recover strength, and to keep quiet. 

How many of us really have this kind of rest as a normal part of our lives? 

This is kind of what my life feels like most of the time:

http://upload.wikimedia.org/wikipedia/commons/d/de/Yoke_china.jpg
In our lives, the stresses of this world tend to make
us feel alone in our burdens and overwhelmed.
And how ironic does this metaphor seem that by taking up a yoke, a tool used specifically for labor, do we find rest, an ending of labor...or even fun? I mean really, how have I missed this before? 

Does that throw anyone else for a loop? 

P.S. I've always pictured a yoke as used with animals, but googling the word pulled up pictures of a carrying pole, used frequently even to this day specifically in East Asia (sometimes called in our society, a milkmaid's yoke). 

Looking at this image, I imagine the toll that such a tool would take on my own body: cumbersome, awkward, and difficult, carrying weight my arms can't support with my shoulders instead. By yourself, a painful, and isolating way to work.

Read Jesus' words carefully: He wants us to yoke together with him. So maybe it is supposed to be a little like the yoke pictured below.


http://stjohnslutheranchurch.com/files/2011/08/SART-2011-07-03.jpg
Jesus wants us to yoke together with him.
Logically speaking though, wouldn't the animals share equal burden? Even if one is stronger, aren't they still teamed up? I'd hate to see what my pairing with Jesus would do to the land if we were plowing the soil together. Needless to say my work would look like a mess in comparison. Talk about feeling inadequate, even on my best days!

But that still doesn't explain how my burden is lighter than the one who I walk alongside with.

Maybe it's because Jesus has, in fact, already carried the weight of my sins, my guilt, my pride... to the cross, and my burdens and my stress on a daily basis in my walk with him. It's done! I don't have to carry them as a believer. His power and sacrifice takes the place of my own burden, making it lighter, peaceful, and restful for me. He urges us to learn from him: walk in the way He did when he was here. He'll take my share of the burden, and all he asks is that I walk alongside Him and tell others about Him.Jesus looks me in the eye and says, "I got this, Amanda. You don't have to worry about the pressures upon you or trying to make up for the bad things you've done in your past. I've got it under control and I forgive you; find rest in your soul for the responsibility I take on your behalf." 

http://www.testimoniesofheavenandhell.com/Pictures-Of-Jesus/wp-content/uploads/2013/04/Jesus-Picture-Carrying-Cross-The-Passion-Of-Christ-Movie.jpg
Jesus carries the weight of our sins on the cross, bearing our burdens.

I mean, wow. Can there be anything more beautiful than that? What a wonderful way to understand a little bit better the meaning of grace. That's what gives me the lighter burden to carry. Not a physical burden as the metaphor may suggest, but a spiritual one.  Jesus says that in binding myself to him in this way I "will find rest for [my] soul."

Maybe that's what's missing in our search for rest. We think we need more sleep, more vacation hours, more beautiful beaches and landscapes to help us "recover" from the stresses of this world. But the spiritual rest that comes from our relationship with the Lord is so much more relieving than 8 hours of sleep a night or a weekend getaway. And spiritual rest can transcend the weights of this fast-paced world we live in and help us to live with a spirit of peace and joy even amidst the busy lives we live.

And in this promise, I take rest. 

----

Other verses on rest to encourage you. Spend sometime this week meditating on the truths given to us about the rest that God provides: 

"The Lord is my shepherd, I lack nothing. He makes me lie down in green pastures, he leads me beside quiet waters, he refreshes my soul." --Psalm 23: 1-3

"The fruit of that righteousness will be peace; its effect will be quietness and confidence forever. My people will live in peaceful dwelling places, in secure homes, in undisturbed places of rest." --Isaiah 32:17-18 

"Praise be to the LORD, who has given rest to his people Israel just as he promised. Not one word has failed of all the good promises he gave through his servant Moses." --1 Kings 8:56


Friday, July 5, 2013

Go on a date, already!

So, I love pinterest. Brides out there: you are very lucky! Back in my day (a mere 2 1/2 years ago) there was no pinterest for all of those wonderful wedding ideas I see you all posting! 

But that doesn't mean I can't use pinterest for marriage ideas! 

So back in college my husband and I would have date night once a week. We were both small group leaders that led groups on different nights; not to mention we were seniors in college, so our time was stretched...all the time. We decided that we would set aside one night a week for time together, and it worked out great. 

Well, once we got married, we (wonderfully) had this non-stop time together! But what we found is that we end up spending most of our time where we feel most comfortable: at home, staying in and watching movies.

But we definitely do not want that to lead to monotony in our marriage. I still want to go on dates even though I'm married! But when I'm being indecisive, we tend to do what is comfortable---back to staying at home. So, motivated to keep up efforts to date my husband, I've pinned plenty of date ideas--plus some great biblical marriage tips--on my marriage board on pinterest. 

But I needed to sift through some of those date ideas, and then stumbled upon the idea of a date jar. The appeal here is to create some spontaneity and make sure that well-intentioned date nights don't become typical and mundane. And with me being indecisive, I thought this was a great idea.

So I'm going to take you through the steps of making the jar and give you a few of my date ideas that I've collected.

Materials: 
  • Mason Jar (had one=free)
  • 1 yd ribbon or so (had leftovers from the wedding card book I made=free)
  • acrylic paint/spray paint (I used what I had on hand=free)
  • Scrapbook paper (had some scraps I used=free) ....see a pattern here?
  • hot glue gun
  • permanent marker
  • popsicle sticks ($2.99 for 75 from Hobby Lobby...used 40% off coupon)
.......YAY FOR CHEAP CRAFTS...UNDER $2 for me...I bet everyone can do this for less than $5 bucks!!
Directions: 
1. Paint the popsicle sticks....I used acrylic paint and used a paintbrush and it was kind of difficult but doable...hindsight...spray paint would have been easier). 

You will need four colors based on how I divided up the dates, (possibly only three if you change the categories), and make sure to pick colors you can write on with a permanent marker.

2. Decorate the jar while the paint dries on the popsicle sticks. I did a double layer of paper with the smaller piece being about 3/4" thinner than the wider. I based the paper width based on the "flat" part of the jar, and hot glued the paper directly to the jar.
 
3. Tie the ribbon, and done! Some people have used a tag to be a "key" for the dates (I would do this at this point), but I just used an unpainted popsicle stick; worked just as well. 

4. Write dates of the same "category" on the different colored popsicle sticks and....voila! Date jar complete!

~~~~~~~~~~~
Ready for the dates? I felt that the hardest part was dividing them up into categories that make sense. Even now as I'm working on this blog I'm moving things around. 

What I settled upon is that since both of us work weekdays that it made since to divide up not only by cost, but about what was reasonable to do on a weeknight versus a weekend.
 
Weekend--Planning, $$$
Painting date--a gift from my hubby!
·      Couples massage
·      Concert (his choice)
·      Concert (her choice)
·      Weekend getaway
·      Painting class
·      Fancy date downtown
·      Cooking class
·      Take a day trip to Nacogdoches
 

Weekend--Spontaneous, $$
·      Outdoor project
·      Go to a museum
Handsome man with some great eats--
Chi'lantro food truck
·      Wings and a game
·      Brunch date somewhere nice
·      Top Golf
·      Shooting range and lunch (her choice)
·      Free outdoor concert
·      Buy a new board game and play it!
·      Go camping or hiking
·      Go to the beach
·      Go to a botanical garden and café
·      Go tour a local brewery
·      Go geocaching
·      Drive in movie
·      Picnic to the park
·      Antiquing  
·      Fly a kite 

Weeknight In--No prep, $
·      Takeout and board game
Day date to the beach with a seafood lunch!
·      Puzzle and pizza
·      Popcorn and chick flick
·      TV show marathon
·      Snow cones! Pick each other’s flavors
·      Sketch out our dream house
·      Plan a big vacation coming up
·      Build a fort and watch a movie
·      Watch stand up comedy
·      Video game night

Weeknight--Go out, $-$$
·      Frozen yogurt date
Love of my life!
·      Food truck
·      Dinner and a movie (his choice)
·      Dinner and a movie (her choice)
·      Coffee date
·      Bookstore outing
·      Bowling
·      Find a new ethnic food place and try it out
·      Italian food and a mafia movie
·      Putt putt or go karts
·      Bakery/cupcake date

Additional notes: 
  • I'd advise you to add in some unique (maybe racy?) things for your life (for instance, my hubby collects coins so for a weeknight-in I added that in.) Also, a day date to Nacogdoches may mean nothing to you, but would be super special to us since that is where David and I lived when we first started dating and fell in love. 
  • Make sure this is somewhat balanced. This is not meant to be all about the wife. Although your hubby will never make a date jar himself, he may buy into the idea more if there are things in the jar that he would actually enjoy doing. LADIES I'M NOT JOKING. If you put spa day in the jar and married to a man's man, you better put the shooting range in there or something he would enjoy doing to.
  • Make a few extra popsicle sticks so that when you come up with new ideas or replace some, you don't have to go through the crafting process again. 
  • If you don't like the popsicle stick idea, use different colored paper and add them to a coffee tin or something. Same song, different verse.
 
Moral of the story: Date your husband! Revive that feeling of early dating with an inexpensive craft and show your man how much you enjoy spending time with him. Life gets busy, but that doesn't mean you don't have the time or money to hang with the love of your life. 

So go on a date, already! :)

Tuesday, July 2, 2013

Wedding Cards Cherished

With the beautiful marriage of my brother-in-law and his wonderful bride just a few weeks ago, it got me thinking that I should really do something with all of those wedding cards given to me back at my own wedding. Ladies, I know you did the same thing as me...put them all in a box that gets shifted to wherever As a bonding time with my new sister and with some (finally) free time this summer, we finally decided to use some of those ideas on pinterest I had seen.

Best part of this project: It was super easy. The hardest part was picking the materials. (And the hole puncher, more on that later).

Materials:
  • 3-4 pages of coordinating colored paper (I used 8.5x11 paper but 12x12 works too)
  • Sticker letters (or some 1-2" letters that can attach to cardboard)
  • 2 pieces of cardboard (and something to cut it with, like a box cutter)
  • about a yard of ribbon
  • hot glue gun, or brads
  • scrapbooking double sided stickers (to attach paper together)
  • 2" office rings (find at a office supply store)
  • hole puncher
Directions:  
1.    I started by hole punching all of the cards. I knew this would be the most boring and tedious part so I started with this. Unfortunately, the hole puncher we purchased (for $2.49, and no, there was not a higher quality one available) had very little...oomph to it. Some cards were very difficult to punch through, but we made it work. I punched about a 1/2" in from the top and side.  


     2.    Then I made the front and back cover. We took cardboard (from any box or purchased in the scrapbooking section of the craft store) and our largest card and gave about 1/2" around all edges to make sure that none of the cards stuck out once the book was completed. Just eyeball it, I promise it'll be okay.
    (Note: I scored the cardboard with my straight-edge cutter, then just folded the cardboard until it snapped, then trimmed up the edges.)
     
    3.     I then used my scrapbook paper to cover the front and back of the cover, creating a band on the front for underneath where the ribbon is going to go. Get creative, but keep it simple.


    4.     I attached my stickers next. I wished they were a little bigger, but it was a "make it work" moment. I didn't have an ampersand sticker available, so a lower case 't' became an "and".


    5.      Last step: the ribbon! I saw that others have used brads going through the cardboard and the ribbon on the back, but I didn't like that idea, because I felt that it was going to be way too difficult (remember the hole puncher?)

    So I took to the hot glue gun and made a strip of glue as wide as the ribbon on either side of the back cover and pressed it firmly (Tip: Don't touch the glue! The glue goes through the ribbon and if it gets on your finger it won't set as well!)


    6.     Tie the bow, and like a pretty looking package, that pile of cards in an old box is now a beautiful keepsake; put on a bookshelf to be cherished (and now, shown off!) more frequently!


    A few more pictures, including my sister-in-law's book as well.


    A little toast...I love it!


    Here we are! Took us from about 4-10pm to shop, eat dinner, and craft (while watching a movie). Such a great evening and wonderful bonding time between new sisters!

    Friday, June 28, 2013

    Syncing your Grocery List

    So, if you're like me, you have good intentions with your grocery list..... 
    Really, you do. 

    http://aproverbswife.com/wp-content/uploads/2012/02/10060-oakley-falling-tide-dress-womens-med.jpgBut then, you make your list, hey you may even write down coupons you have. You stop by the grocery store after work, find your coupon file in your purse....then you realize it's happened. 

    You've left the list on the refrigerator...again. 

    So then you call your spouse, who is, unfortunately, still at work, to try to desperately remember as much as you can from the list since you're already at the store and don't want to waste this opportunity.


    How's that working out for you?

    So I remember looking for an app awhile back that could serve as a grocery list; I even tried a notepad app on my phone. But it didn't organize well, and I still found myself texting my husband asking him if there was anything else we needed from the store. He doesn't always respond immediately. 

    So then a few months ago I found the "Out of Milk" app. Here are the major reasons why I'll find it hard to go back to a normal grocery list:
    • It's organized: And you can make your own headings (like frozen, fresh, health) and order them the way you want to go through the store. You can also reorder the items within each section if you'd like as well. I also have a home improvement section and leave it on there for when I go to store other than the grocery store.
    • Coupon use: I don't extreme coupon, but I do have some coupons that I use. This app has a way that you can attach a note to the item you're purchasing with the coupon amount and it puts a green tag next to the item so you don't forget to pull the coupon at the checkout line. It'll even calculate the total of your purchases and coupon amounts if you type in what you need.
    • Bar code scanner: You can scan a barcode and add it to your grocery list. So before throwing out your favorite cereal, you can scan the barcode and add it back to your list.
    • Pantry List: It gives you the opportunity to add in what you already have in your pantry so you don't overbuy (its example is for spices). Honestly, I don't use this function of the app yet, but I understand how it can be useful.

    • FAVORITE FUNCTION: SYNC! The app is able to sync to other app users....implications? My husband has the app on his phone, so no matter who is able to stop at the store, they have the list. Or, either one of you can add things to the list. If you remember something in the middle of the day, you can add it and you don't have to have conversations every time you go to the store to make sure you're picking everything up. Parent of a teen? Think of the possibilities...
    Anyways, try it out. It's free, easy to use, and able to share with others in your family to use as well. 

    http://www.scandit.com/wp-content/uploads/2012/07/out_of_milk_blog-570x194.png

    Monday, June 24, 2013

    No more barking!!!!

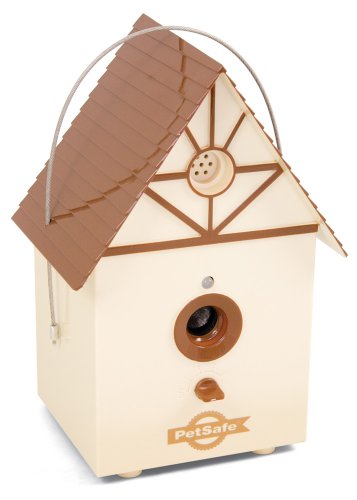
    So many of you saw my photo upload of a product I purchased about a week ago called the PetSafe Outdoor Ultrasonic Bark Deterrent. This purchase came after about 6 weeks of non-stop barking every time we walked into our backyard. Lucky for us the wonderful home we purchased in early May is surrounded by five dogs by the bordering three backyards.

    Now, Dog #1's not so bad. He doesn't bark too much, only when David is weed eating, which I assume is normal. Other than eating straight through the boards on our bordering fence (seriously), he's a pretty chill dog. 

    Dog #2 is the loudest barker. He makes the fence shake when he rams up against it, and reminds me of the dog in Sandlot. Pretty terrifying, never felt safer behind a fence. 

    Dogs #3-5 are all in the last backyard. There are two pit bulls and what looks like a Jack Russell terrier. They make for a fun barking adventure because once one barks, they all bark, growl, and fight each other.  Definitely the biggest obstacle to peace in the backyard. 

    So I tried to talk nicely and peek through the cracks to try to build a good relationship with the dogs. Hah, you can imagine how that worked (it didn't). Then a friend suggested to throw dog treats over the fence when they start barking to ward off aggression. Knowing my luck they'd be on some special diet and the dog treat I'd give them would have gluten in it or something and our new neighbors (who we are simultaneously trying to build a good relationship with) would sue us and we'd have to sell the beautiful home we just purchased.

    That was not gonna work.

    So what did I do next? Check the internet. 

    I know that there were "clicking devices" on the market for training dogs, but that didn't seem like it was going to work, so I hoped that there were other homeowners out there who had been through the same thing. 

    That's when I stumbled upon this birdhouse looking thing that I ended up purchasing. 

    I read as many reviews as I could tolerate about the product, and I felt like it was 50/50. Either people love the product and it worked amazingly, or said it didn't work and ended up returning the product. 

    Well, if I have five dogs in my backyard, I figured that if it calmed down two or three, it would be worth the money. 

    Here's the review: I purchased the bark deterrent for about $60 bucks at a pet store. I know I could have bought it cheaper online, but I wanted the opportunity to return it if necessary. I hung it up on a tree facing two of the fence lines (dogs #2-5) on Saturday afternoon. 

    The first two days were silent. I heard no dog barking...but I didn't see any dogs either. I'm thinking that it was just too hot and they weren't around anyways. 


    But over the last week, the results have been dramatic. DRAMATIC. The first few times I went outside and the bogs started barking, they barked a few times and then their barks tapered off, (almost questioning sounding?) and then stopped altogether. And I can see them standing near the fence, so I know they haven't run away. Dog #2 still barks, but if I turn the birdhouse to face him, he backs off. Dogs #3-5 growling at each other has stopped as well. 

    I've almost felt that it's worked too well. But so far, so good.

    I would say (for the bottom line people) that there has been an 80% reduction of barking from the dogs. How's it work? It emits an ultrasonic sound when it hears a repetitive bark is up to a 50 foot radius. It takes a 9V battery that it says needs to be replaced about every two months. 

    Minor caveats: It warns that it won't work on dogs with hearing loss (umm...duh?) and users say it doesn't work as well for floppy-eared dogs. And you can't use it inside, you'll have to stick to the Thundershirt. Sorry.

    Altogether, I would rate this product 5 of 5 stars. It is safe for the dogs (which I wanted) and can be used for your own dogs or on neighbor's dogs. It also looks like a birdhouse, so it's inconspicuous in case a neighbor freaks out and doesn't know why their dogs aren't barking.

    I think it's ingenious an has been totally worth the money. 

    So if you've been dealing with dogs barking too much, I'd say it's worth a try. Go for it. See the link at the top (product name) for more information. Hope you're just as happy with it as I am!

    Post any questions or responses here, I'd love to answer your questions!